Business, marketing, Tutorials

The Power of Polyvore – Why Makers Should be Collaborating with One Another + Other Tips

For today’s tip post, Beth of Wilde Designs is sharing how important collaboration with other makers & brands is, and how simple it is to increase your range & traffic to your shop by using Polyvore!

22199322_10100837353839176_1405599292_o

We all love pretty things. Shiny things. We like to imagine that whatever we make will be part of a stunning collection of goods in a magazine someday. alongside larger known brands. 

The beauty of the internet is that we don’t have to wait and wonder what these beautiful collections might look like! There are so many ways to do gorgeous product collages, also known as “flatlays”, on the internet on our own, and so many ways to collaborate with other makers, designers & brands to make these collections go viral!

Why create a product collage? Not only do they allow our audience to see what our products might look like as part of a cute outfit or in a trendy room, it also lets us put ourselves alongside other larger known brands & makers that compliment our own products. Want your bohemian necklaces to be associated with Anthropolgie styles? Pair them with products from Anthro, headbands from your favorite hair accessory maker, a succulent planter from your favorite sculptor, and so on. Make sense? 

Why collaborate with other small shops? Small shops need each other. We can work together to get extra social reach, to find new customers, and to build each other’s brands and communities! Most importantly, the more brands you collaborate with, the greater possibility of your products going viral! Product collages are a fantastic way to encourage this! Not only do you build up other small shops, when you select items from big companies, you get extra exposure by tagging them in your posts and helping their audience find you & associate your products with that brand as well.

22236281_10100837353844166_1900549888_n

My favorite avenue for creating quick, attractive product collages is Polyvore. Setting up an account is free, and you can add your products quickly and easily by installing the Polyvore Clipper button onto your browser. Navigate to the page of the item you want to add, click the button, and input the details.

22243683_10100837353829196_93021557_o

While you’re at it, add items from some of your favorite shops. You can even create a team of shops to create & share products from one another in various product collages, saving you a lot of work! For instance, if you sell necklaces, maybe you know someone who makes fantastic handbags or designs shirts that compliment your jewelry. Find a way to involve other sellers, and you both end up benefiting from the collection. When you’re building your product collage, you can search the items you’ve added or search all of Polyvore to find new things that match your brand’s style.

22219310_10100837353819216_57361543_o

Once you have selected your shops you want to work with & big brands you want people to associate your goods with, start building your collection and making it lovely. Polyvore lets you add text, borders, and other flourishes to spice things up. Even better? It works fabulously on desktop or mobile. Once you’ve created a flatlay, you can publish the set. You get the option to share it simultaneously on Facebook, Twitter, Pinterest, Blogger, and a lot of other platforms. Instant reach with minimal effort!

22219219_10100837353834186_1702360932_o

Do yourself – and your brand – a favor and go play. You’ll never look back once you see how easily you can boost the visibility of your productss and collaborate with both the small and big box shops you’ve always wanted to work with!

makers, Uncategorized

Meet the Maker: Dani of Big Hugs, Little Envelopes – a maker every maker should know!

You guys, this Monday, you can thank me for starting off your week introducing you to a maker who creates supplies that makes running your business so much more fun & colorful, and soon, SO much easier! Get to know Dani & all the services & products she offers makers below, and be sure to visit her shop Big Hugs, Little Envelopes to view the full range of products as well – she is offering 20% off with code SAVE20 to all Lu & Ed readers through December 31st, 2017! Thanks, Dani!
unnamed

Heeeey Dani! Welcome to my blog! Let’s get started – why don’t you tell the readers all about yourself?

Hey, guys! I’m Dani, a life-long Colorado girl, mama of two rad boys, and wife to one totally amazing dude! I am a teacher by trade and actually taught elementary school for 12 years before deciding to take a break and stay home with my kiddos! I have taught every grade K-5 and loved them all, but 5th grade will always have a very special place in my heart! My schooling has all been centered around teaching, of course! I am certified to teach K-6 and, am endorsed in gifted education. With my Masters in literacy, I am also endorsed to teach reading K-12 (though I haven’t yet ventured into the land of middle or high school!). I also have a minor in French, but I tell ya what… that is definitely a “use it or lose it” skill. I’m bummed that I don’t get to use my French more often, and I fear I am forgetting it quickly! In my free time (wait… what’s that???), I love movies with my family, dance parties in the kitchen, scrapbooking, writing, reading, running (slow as a turtle!), and enjoying the gorgeous outdoors of Colorful Colorado. I couldn’t ask to live in a more beautiful place!!! I almost never watch live TV, but I love to pop on a show while I work, and my current Netflix/Hulu/HBO streaming addictions include America’s Got Talent, Shark Tank, Grey’s Anatomy, Big Little Lies, and This is Us!
unnamed (1)

Have you always been such a wildly creative person?

Well, that is certainly a lovely compliment – THANK YOU! Yes, I have always thrived on creativity. For as long as I can remember, I’ve been making and writing and doing… It’s in my blood, as I think is the case for all creatives! I can remember making little dresses for my dolls when I was very young out of random things like toilet paper and yarn. Over the years, I have experimented with MANY creative outlets, including drawing, painting, clay work, sewing, cake decorating, jewelry making, embroidery, crochet… You name it! If it involves the creative process, I’ve probably tried it!
unnamed (2)

How did you get started in digital design & print services?

It’s a funny story, really! Let me back up a bit… I’m super big on the idea of Happy Mail. It’s always been very important to me to send thank you cards, birthday cards, anniversary cards, etc. As a kid, I even had several pen pals around the world. I just truly believe that a simple card in the mail with a handwritten heartfelt note has so much power to make someone smile. So often, the mailbox is filled with bills and ads and other junk. Personally, I love getting a note in the mail, and I know other people do, too! It’s such a sweet way to brighten someone’s day, and the ripple effect of kindness is fascinating to me. I LOVE the idea that I can literally send a smile through the mail, which has the power to turn someone’s day around, and in turn, they could smile at someone else who needs it, and on and on… You just never know how far it’ll reach!
Fast forward to about 3 years ago. With the pause in my teaching career, I had more time to embrace some of my hobbies again. I’ve been obsessed with scrapbooking and paper crafts since before my first son was born 10 years ago, and with my newly found freedom, I picked up card making, which quickly became another obsession! I bought up a TON of stamps, inks, card stock, patterned paper… Oooooh boy! You already know how I feel about mail, so I found myself making cards for anyone and everyone! Eventually, people started telling me I should sell my cards. I thought they were CRAZY! Who in their right mind would pay actual money for them??? But, with some AMAZING cheerleaders behind me, I decided I had nothing to lose! I started up my Etsy shop, Big Hugs Little Envelopes, keeping in line with the idea that, although it may be a small envelope, it contains a big dose of love and kindness! Sure enough, my biggest cheerleaders became my first customers, and my little shop was up and running! Before long, people were asking me if I could make signs and shirts and other items. I’ve never been one to turn down a creative challenge, so I embraced all of the requests! One thing led to another, and before I knew it, most everything I was doing was digital. I now have a whole crew of machines here in my crafty space that help me do what I do! If you had told me three years ago that I’d be where I am today, I would have called you crazy! I never in my wildest dreams thought I’d be running a successful business doing digital and print work, but I wouldn’t change a single thing!
unnamed (3)

What is your favorite products to design?

Oooooh…. That’s a toughie. I am completely fascinated by the sublimation process, so one of the most satisfying things for me to create is mugs. It’s so wild to me that I can design something on my computer, print it out using special ink and paper, and then permanently transfer it to a mug that then is dishwasher and microwave safe! Even though I’ve done it hundreds of times now, it still feels like magic to me every time I take the mug out of the press! On more than one occasion, I’ve found myself saying aloud, “That is so stinkin’ COOL!!!”
unnamed (4)

Making for makers must be so inspiring – how many different shops do you work with in a month, usually?

Ohmygosh, it REALLY is! When I started this gig, I had NO idea there was such an amazing maker community out there, but I am so incredibly honored to have found it and become part of it! At this point, over half of what I do is for other makers! I would say in any given month, I work with 20-30 shops, which blows my mind! It gives me so much satisfaction knowing that my small business is, in turn, helping their small businesses! My philosophy is that we are all in this together, and that there is plenty of love to go around. It’s that whole “Community Over Competition” idea, and I embrace that wholeheartedly. I seriously love promoting other makers, as you’ll easily see on my social media platforms! My wish is for all of us to be successful, and if what I do can have a hand in that, I’m thrilled! I’ve also become amazing friends with so many other makers throughout the process, and have gotten to know some super sweet, highly talented people (like YOU!!!)! Sometimes I even get to meet them in person, and that is AWESOME! (This summer, I got to meet the lovely Sue from Glass and Stone – my heart was SO happy!!!)
20424319_1923691317904777_617741637417471775_o-1

You are one of my favorite people to follow on social media – you are so positive! What sort of daily routines do you have in place to keep the happy flowing?

Oh wow, thank you! That is so kind! It involves a lot of coffee! Haha! But truly, I really just try to live in the moment. I have come to realize that life is so short and so precious and that we are all on this planet together. I personally have felt the effects of kindness and love, and I know first hand how powerful that can be, so I just want to do my part every single day to pass that along to others. I genuinely believe in the magic of a kind word, a hug, a smile… My home is filled with inspiring quotes, which I look at daily, to remind me of how lucky we are to be part of this amazing thing called humanity.
Screen Shot 2017-09-18 at 3.05.58 PM

You specialize in custom branded goodies for makers, so I have to ask. What are three MUST HAVES for makers when it comes to branding materials?

For me, my business is all about the human connection. So, while a true marketing professional might disagree, my must haves involve things that help people connect on a personal level. I love, love, love creating stickers for makers to use on their packaging as a fun way to say thank you to their customers.
I also believe in a handwritten thank you note with each order, so custom logo cards with a space to write are always a favorite of mine!
And of course, I think a key aspect of any business is the ability to be easily recognized, so anything that includes an identifiable logo is huge! I love creating logo stickers, notecards, mugs… you name it! 🙂 If people see your logo and immediately associate it with your high-quality products, I think you’re doing something right! 🙂
17554435_1854590924814817_2249433365403054690_n

Tea, cocoa or coffee?

Oh girl, why do you have to give me the hard questions??? Is “Yes, please!” an acceptable response? 🙂
19577424_1909763499297559_2197207496968875059_o

What is your favorite color?

Again with the hard questions!!! I love all things rainbow, and any color that is bright and happy is good with me! Current faves are any and all shades of teal/turquoise/mint/pool, pinks, purples, and sunshiny colors like yellows and oranges. I’m gearing up for fall, though, so I’m sure I’ll soon be surrounding myself with warm, calming browns, deep oranges, and dark greens.

IMG_8053.jpeg

Is your home as colorful as your products & social media feed?!

Haha! Yes. Yes it is! Like I said, color makes me so happy, and I love surrounding myself with it. It really does have an effect on my mood! When I want to be calm and peaceful, I find myself retreating to my bedroom, which is done in pale blues, gentle browns, and soft greys. When I’m feeling energetic and productive, I’m most often found in my maker space, which is full of all things bright and cheery and motivating! A good bit of my decor in there is actually handmade goodies from other makers! My kitchen and family room are warm and inviting, with the reds and yellows and browns that make me feel comforted and safe at home. It’s all about color around here! And of course a good bouquet of colorful flowers in any room makes me smile, too!
It was so fun getting to interview Dani & introduce you all to her amazing shop. She has something very, very exciting in the works and you NEED to follow her on Facebook & Instagram so you don’t miss out when this project launches!
Business

How to take excellent product photos using only 12 square inches of space

IMG_3534

I constantly get emails & messages on social media from fellow online sellers asking for tips, advice on their listings, or shop critiques. One of the main things that many sellers struggle with is photography, and often the response is “I don’t have anywhere to shoot” or “I don’t have a ton of natural light”. So, I wanted to put together a quick tutorial on how to shoot excellent products like the one above in no more than 12 square inches of space!

All I used in this shoot is one piece of paper & two photography lamps. They have adjustment legs, so you just need about 12″ of floor space on either side of your surface to stand the lamps up, so space isn’t an issue. As far as cost goes, my set of lamps are about $80 on Amazon. I did find this set for under $50 at Wal-Mart and this set for $40 on Amazon, and I’m sure with a little more digging, you could find a set for basically any budget.

I cannot stress enough how important of an investment professional lighting is for a maker so you can have consistent, even lighting in every single set of images. There’s “hack” videos out there for turning household lamps into photography lights, and I’ve tried almost every one of them. They do no compare to the real deal, but can tide you over until you can score some of these beauts.

To really demonstrate what a huge difference they make, here is an image of my work space for these images with the overhead light off.

IMG_3537

Same exact space with the photography lamps on. See the enormous difference? Minimal natural light here, so for all those people with a day job doing this as a side hustle, or mamas who don’t get time to get their goods out for shoots until evenings – photography lamps! Order them, stat!

IMG_3540

Zoomed out shot of my work space for these images – please don’t judge my messy studio, I was just wrapping up a day of monster making! As you can see (I brightened this image a lot just so you can see), I have one West facing window, and you can see the shadow my house throws in the evening on the grass. We have an enormous maple tree that completely shades almost our entire house, so my studio gets very dim at about 3pm, and this was taken at almost 5.

IMG_3542

To make sure I didn’t use more than 12″ of space, I used a ruler & washi tape to roughly mark out lines on the table and wall, effectively creating a 12″ cube of shooting space.

For affordable backgrounds, scrapbook paper. This entire file is 8″x12″ paper. As you can see, TONS of possibilities for backgrounds, and this size of paper is usually 15 cents at craft stores.

IMG_3551

I chose a white embossed style paper (averages about 30 cents, I think, at most craft stores in the scrap book department).

IMG_3544

These were my subjects – Random Sh!t jewelry dish by Clay by Laura, a piece of rose quartz from my son’s insanely extensive stone & gem collection, and a necklace from Almond Eye Creations.

IMG_3552

I put the dish & rock on the paper on this beat up dark-ish table, and snapped these  raw images with my Canon Powershot point and shoot (not my DSLR).

I used some free photo editing software on the internet to crop, rotate images to straighten them out, brighten, and slightly increase saturation in the images to really show off the amethyst.

And that is how you create excellent images for small products in just 12 square inches of space! It all comes down to professional lighting, creative use of space & supplies, and good angles.

Sidenotes: If you don’t have white walls or a ton of space, substitute by taping white posterboard ($1 at the Dollar Tree) up when you need to shoot images, and store them upright behind book cases or the couch.

Have other photography questions? Post them in the comments & I will create posts to help with all of your photography needs!

Business

3 Ways to Market your Online Shop – Offline

I work directly with a lot of makers, and often they are struggling to get their online shop found. They make Facebook pages, Instagram accounts, start blogs, and even join eleventy million groups for entrepreneurs, buying and selling, and all things crafty – but they still struggle to drive traffic to their online store.

3ways.PNG

Some of the most impactful things I have done to grow Lu & Ed online has nothing to do with wi-fi, computers, or social media. Those things were done outside of my home, away from my laptop & face to face with other humans – and I want to share some ways you can leverage offline marketing to grow your online shop, too!

bfafd-10271564_644864818920490_6311701320068431163_n

Vendor Events

Craft shows, exhibitor events, markets, pop up shops, even weekly farmer’s markets – setting up shop for local in-person sales is a HUGE way to grow your brand in an affordable way while generating revenue.

There is typically a cost involved with setting up – the booth fee or vendor fee. Keep in mind, the higher the price, while intimidating, typically means the event is better promoted, in a good venue with lots of traffic, and brings in higher quality wares which means established sellers with wide audiences are most likely the vendors. The better the vendors, the better the event, so a higher cost is typically a really good thing and should not deter you from trying an event.

In order for in-person events to be successful, you need to have a visually appealing display, which can also involve costs to get props to properly display your wares, but these are tax deductible and you will use them for DOZENS of events so the ROI is very high on them! But before you head to IKEA and whip out the check book, keep in mind: Most displays for craft shows can be found at thrift stores or garage sales for very cheap, often less than $10, and can be spiffied right up with a coat of paint that matches your brand colors & given a new life as your display. My entire display cost less than $30! My table cloths are colorful sheets I found for less than $1 each, my tables were gifts from family, the shutters and shelves and racks all cost less than $5 total. So I cannot recommend visiting various thrift shops locally to find pieces to tie into your displays!

Ready to learn more about events? Read my article 20 Tips for Craft Shows to get more info on what you can do to make an event a success, including scouting events, building your display and what to take with you on the day of the event!

IMG_2706.JPG

Get Involved in your Community

Join your local small business association, join a local moms group, teach a class at your local library or community center, join a yoga class, go to a weekly event a venue near you hosts. Get out of your house, get offline and go meet real people in your area.

I cannot stress enough the importance of being active locally to grow your online business. I’m in no way advocating telling everyone you meet about your business – please, don’t.

I’m advocating creating meaningful connections within your community. Get active. Meet people. Make authentic connections with other humans. Find people you relate to & get to know them – strike up conversations with people at the coffee house, volunteer at the animal shelter, join a class at your local college doing something you love, go to yoga in the park,. Find something you love to do, and connect with other people who love to do that as well.

For instance, I started a moms group here. I am also a member of a local home school group for my son. This has been an invaluable resource for me. Connecting with moms gives me a sense of belonging, helps me decompress when my online shop stuff stress me out – but also, spending time with people who happen to be my target audience has brought me numerous sales & even a wholesale opportunity from play date acquaintances and word of mouth! In any group setting the “what do you do” question comes up – and if you have perfected your elevator pitch, that is when you can create ties within the community that will revibrate points of contact back to you.

pexels-photo-305098.jpeg

The Spider Web Affect

Think of community involvement like a spiderweb. You are at the center of it, and every connection you make is a string that works to the outer circle. All of the connecting strings are people that they know, that knows someone else, that knows someone else. Every string you create, the bigger your web gets. Every time you pluck a string (initialize discussion about your online shop, products or what you do with a connection) the entire web connected to that string vibrates. It creates a ripple effect, with more and more people learning about your online shop & what you do through word of mouth and referrals.

Word of mouth is still considered one of the most valuable forms of marketing, and you can tap into that goldmine by becoming active in your local community & making authentic connections with other humans. This is not about telling people about your business. This is about creating a real connection, maybe even making friends, referring people to the connections you make, and strengthening community ties! A rising tide lifts all ships, and all that!

2ce03-img_5389

Teach or Volunteer

One of the best ways to get your business out there is to share it! Here are some examples of how to use your trade skills to grow your online business while generating revenue or donating your time:

Jewelry makers: teach a simple workshop teaching Girl Scouts or home school children to make bracelets. Send the finished works home in bags with a coupon for your shop!

Potters: have a thumb print ornament making work shop. Have your other items out on display and let people know that they are available for purchase, or say maybe if they make a purchase they can make a second ornament for free. Get creative!

Toy makers: host an art hour for children at your local library. Put together goodie bags for the moms with your business info & a coupon, perhaps a small sample.

Artists: offer a wine & painting/creating session for women, and have an art print sale going during the event!

Fiber arts: offer basic skill classes at your local community center, and have finished products available for sale. In everyone’s kits, include promotional materials for your shops.

Clothing: put together a “party” at a local venue where people can shop your goods, try them on, and receive a swag bag with jewelry, gift cards, etc in it from local or other handmade businesses. Make it a fancy, exclusive event like those legging parties (you know the ones!) with food, fun & best of all, YOUR clothing! This would be a great way to collaborate with other local businesses to borrow their venue – maybe a jewelry boutique or a winery would be willing to let you host a party at their establishment and market it to their customer base.

Homework: set goals today!

Don’t put it off! Set some goals today – make a list of things you think you would like to do to grow your business offline. Then research ways to make those a reality, and start making some phone calls, turning in show applications or signing up for local events!

I would love to hear from you in the comments – how do you feel about growing your online business offline? Does it make your uncomfortable, or is it something that you are excited to try? If you already are active offline, share how in the comments, too!

Business

Simplify Your Week: Create a Happy Little Content Calendar (free printable)

You know the feeling – waking up, not knowing what to say or do on social media/your blog that day. Putting out less than perfect content on those days and grumbling in groups about how you just are never sure what to post besides product photos or WIP shots.

What if I told you eliminating posting stress was as easy as writing seven things down? It is! And today we’re learning about content calendars and how to use them to your advantage. I actually sat down this morning to create a content calendar for blogging so I can begin to work on posting several days a week again, and that is what inspired this post!

What a content calendar does is create a visual guide of what to post, when. It can be as strict or as flexible as you want. You can schedule specific content for specific days months in advance (especially helpful during holiday sales seasons, craft show seasons, and the like!) or have the same general content calendar that just evolves as seasons change (this is what I do).

To get started creating a happy little content calendar, you need to print out this happy little printable (available in color or black and white). I tried to size it so it can be printed as one large guide to hang in your studio, or in multiples & inserted into planners. I’m just getting into the planner game, so expect a few more fun freebies like this to come your way as I figure out what I need from my planner!

content calendar color.PNG

Once you have your happy little content calendar printed out, it’s time to do the actual nitty gritty work. A good content calendar has a diverse mix of content. If you completed the Dream Client workshop, you have a really good idea of who your social channels should be appealing to & what sort of content they want to see. For an example, my Dream Clients are young, eclectic moms who are eco-concious & passionate about motherhood, that live in the suburbs or city. They like my products because they are sustainably handcrafted, unique and colorful. I carefully reviewed what accounts they may likely follow on social media, and spent a lot of time analyzing the content of my Dream Clients favorite accounts were putting out. I collected screen shots, browsed their websites, and observed how they captioned their posts & interacted with their audience.

Armed with the knowledge from my research, I know my social media feeds need to be:

  • colorful, positive & empowering
  • reflect my brand’s sustainability practices
  • easy to relate to & welcoming for mothers

Using just these bits of knowledge about my Dream Clients & what content appeals to them, I created a list of authentic posts that need to show up in my feed every week (ding! A content calendar!):

  • Photos of me & my children (motherhood is a tribe, so I frequently put myself out there to connect with my audience!)
  • Before & after photos – a lot of my Dream Clients can’t visual what a “textile discard” is so I demonstrate it frequently in posts where I show what the finished products are made from.
  • Relatable content – hey mamas, I see you, I hear you, I am one of you. And I’m tired, too.
  • Photos of my products in use – my Dream Clients are selective about what they bring into their lives, so I use photos of my products from my target audience to draw in more of my target audience.
  • Random bursts of color & happy – my Dream Clients love positivity, support & kindness, and so do I! So I make sure to frequently post an uplifting photo & caption.
  • WIPs – my Dream Clients tend to be slow buyers, so hearing about the process & seeing a product from raw materials to half sewn to fully completed really helps showcase the work that goes into each piece & really demonstrates the one of a kind aspect of my products.
  • Finished product photos – because every time someone in your target audience clicks over to your social media accounts, they should be able to see at a glance exactly what it is that you do!

And there you go – a full week worth of content!

Radical honesty: I don’t always post every type of post every day every week – I actually usually don’t post at all on Saturday and Sunday. And you don’t have to either! I use my content calendar as a guideline for what kind of content I should be putting out so that my feed always has a good variety of content, fits what my target audience is looking for and represents who I am & what I do. Having it on paper makes it easier to make sure you don’t stray too far from what your target audience is looking for and keeps your content relevant & visually cohesive.

I’d love to get a peek at your content calendars you come up with after reviewing the Dream Client exercises! Feel free to leave me a comment telling me what you put on your calendar, shoot me a photo of your happy little content calendar all filled out to cody@luanded.com or tag me on Instagram!


Business

Dream Clients – The ULTIMATE Guide to Defining Your Target Audience (& Approaching Them!)

Defining your target audience can seem like a pretty daunting task. I mean, as artists, makers & small business owners, we want EVERYONE to want to buy our stuff. But when we are marketing to everyone, we are wasting time, energy and resources because (hard truth) only a tiny portion of the general populace are actually the demographic who would purchase products from us.  I have revised and condensed my series on identifying your target audience, their interests, personality traits, online habits & how to approach them to help makers & shop owners narrow down their niche so you can use your time spent marketing & your advertising budget into a powerhouse avenue for generating sales!

Commonly, when I mention finding your target audience, people reply with “But I sell necklaces, everyone wears necklaces” or something along those lines. 1. Sorry, but that is not true. 2. Defining your dream clients does not mean that if you currently sell products to people in their twenties AND their seventies that you would no longer be selling to them – it means that you are identifying the social class, personality & interests of the people you want to buy from you, people who are influential about products similar to yours, so that you can maximize your marketing to bring in even more sales beyond the sales you are already generating. There’s a saying that goes: If you are marketing to everyone, you are marketing to no one. However – if you are speaking to just the right people, in just the right way, at just the right time, imagine the possibilities! Increased engagement on social media posts, less money spent advertising because your approach is hitting it just right, every single time, and more sales.

That is what identifying & marketing to your dream client is all about!

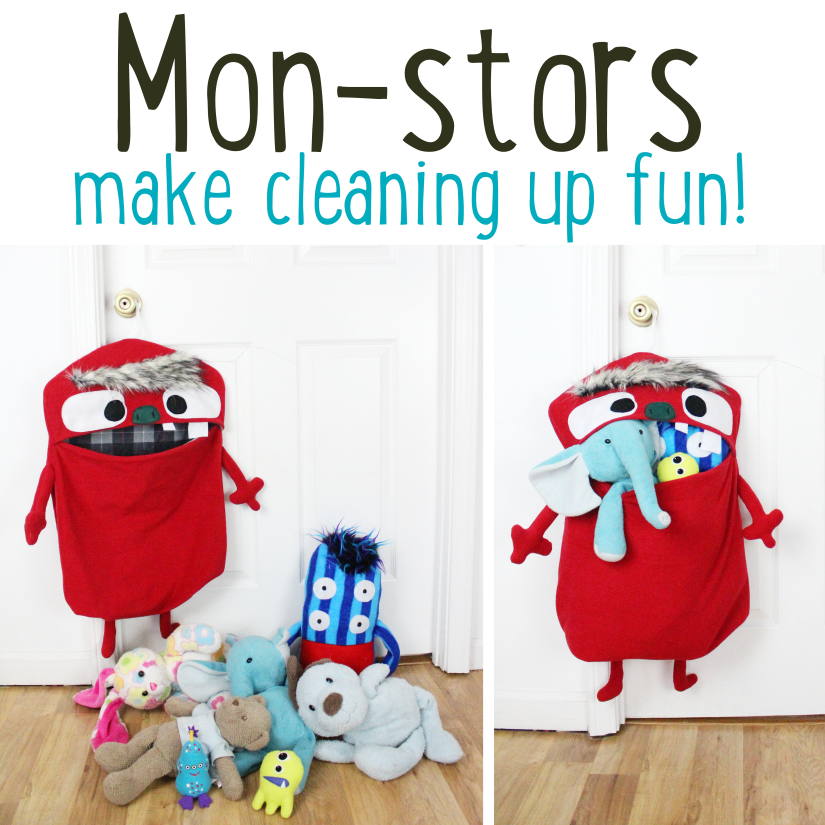
For instance, I make toy storage solutions and plush toys. Using the market to everyone concept, I could ask all my friends to like my Facebook page & follow me on Twitter & Instagram, but let’s be real – do I really think that my boyfriend’s 24 year old brother or people that are his age/gender has any interest in my products, would buy them regularly & share them with their friends? Would those single male friends also buy my kid’s toys? What about my single female friends who have no desire to have children? Or what about all those people in the craft forums I’m a part of? Do you really think that other makers are my target audience for handmade toys? Do you really think if I get any of those people to like my Facebook page or follow me on Instagram, it will result in more sales? A few, perhaps. Maybe even a dozen! But not as many as if I was marketing my brightly colored, ecofriendly toy storage solutions specifically to young moms who have eclectic tastes & want sustainable, ecological toy storage solutions & toys for their small children, don’t ya think?

So, as you can see, while you may make sales to a few people who aren’t in your target audience, if you identify and market specifically to the people most likely to buy & share your products, you have a much higher ROI (return on investment). In this post, you will find a series of questions, printable worksheets & topics to research to help you through the process of seeing better results through your marketing efforts. Each step is integral to really begin to understand how your target audience views & consumes products – and how to approach them so that they want to buy YOUR products. So grab a cup of coffee, a note book, dive in & get ready to launch your business into Success mode!

dreamclients

Let’s start at base one – identifying your target audience, AKA, your dream clients. Dream clients are popular web-celeb personalities you would LOVE to see sharing your products, raving about them to their followers. Think of three popular influencers that you want to buy your products.

Got a visual? That is who this series is about reaching. And in those post, we will be focused on identifying them, getting to know them, figuring out when they are online, and learning how to approach them.

When you think about the most popular, influential people you know that you would love to see sharing your products on social media…..

What is their gender indentity? 

What is their style like?

How old are they?

What is their favorite social media platform?

Do they live in the suburbs, city or country? In a house or apartment? 

What kind of hobbies do they have? 

What sort of job do they have?

What is their average income like? 

Are they blissfully single, or happily married? 

If neither, are they planning a wedding?

Are they parents? 

If yes, are they natural parents?  

Do they have pets? 

gettingtoknow

Remember, this is not about your current clientele but your DREAM clients. The most influential people you can think of that you want to see buying, using, wearing, and sharing your products! 

Expand on as many questions as you can – the more you can identify about your target audience, the easier it will be to learn to market to them! If they are parents, how many kids do you think they have? If they live in the city in an apartment, how do they decorate & use their space? If they are trendy, describe how you imagine their personal style.

You can either print out this worksheet, or fill out the questions in your notebook – whatever works!

dreamclientworksheet1

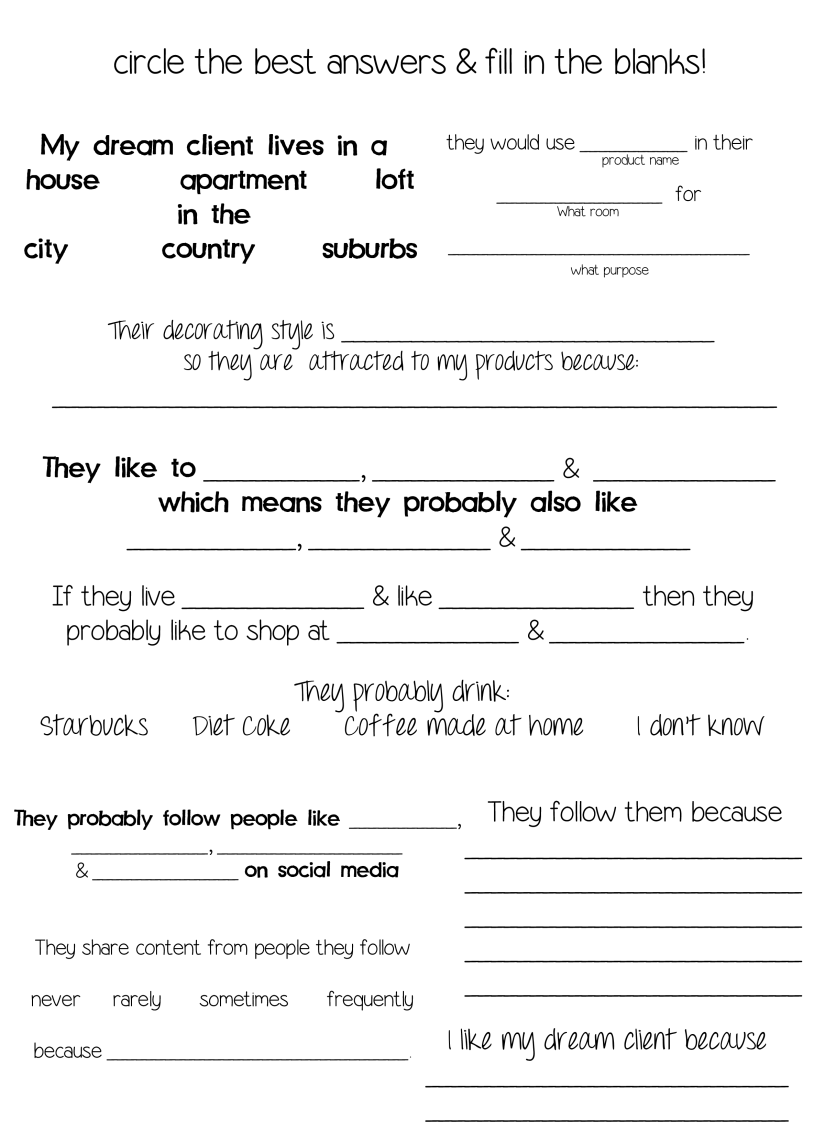
Download this printable here

How to use this worksheet:

Again, this is not designed to analyze your current customers but to help you identify & define your target audience. These are the most popular & influential people you can think of that you would want to buy & showcase your products on social media.

Parts 1-3 help you identify their style and how your brand & products fits into their life by helping you determine where they live, how your products fit into that space, and why they would like your stuff to begin with. No matter what you make, your dream client has to want to bring it into their home/life, or they won’t. It’s as simple as that. By identifying where & how they live, how they decorate & use their space and how your products fit into life, you have a better chance at staging photos & writing copy that translates into sales. A dream client who has a very bohemian vibe & all natural, sustainably sourced furniture will probably not be attracted to monochrome, ultra modern art in your product photos for your dream catchers or throw pillows. Make sense?

Parts 4-6 help you define your dream client’s interests and spending habits, as well as what sort of marketing tactics they are attracted to. Understanding your dream clients interests and consumption habits help you understand how they respond to marketing from larger industries & how your products fit into their consumption habits. Did your dream clients rush to Starbucks for the limited edition Unicorn Frappe? Or do they take moody shots of their home brewed coffee overlooking the lake they live by? This knowledge helps you analyze your own social media and marketing habits and alter them to appeal to your dream clients better.

Parts 7-9 help you to understand what type of content your dream client likes on social media. This is SO important – knowing what type of content your audience enjoys, actively pursues & shares is the keystone to how your social media campaigns should be administered, from photo styling to product modeling to how you talk about your products – recognizing the type of content your dream clients actually consume and respond to will help you create a killer social media campaign!

Try to think of at least three-four people to put on this worksheet that your target audience follows. It can be celebrities, indie brands, bloggers. Who already has your dream clients flocking to them for products or advice? Now, determine why they would follow those four people. Is it because they are all funny? Inspiring? Spiritual? Are they all kids clothing designers & parenting lifestyle bloggers? Are they all trendy moms? Photographers? What is it about these people your dream client loves? And of course – does your dream client share content from these people? By sharing, I mean do they buy their products and share them modeled in their home/on their bodies? Do they repost their images or recommend people read the blog?
Understanding what sort of content your dream client is looking for & how you can produce similar content that is unique to your brand is essential to making sure you are “on point” with your marketing. Explore the people you think your dream client would follow. Look at this objectively – do not try to find similarities between the people your dream clients follow and you.Look for the differences. Learn from them. Look at how they style their images & present themselves & their brands, if they are businesses. You use this knowledge from this worksheet to create social media feeds, take product photos, write copy & create ads that appeal to your dream clients.

Now we are going to explore how to use this information so that we can assess where online & offline our dream clients are hanging out! I will be sharing my responses along with some ideas of how to use this information to find your dream clients.

Here is the low down on my dream client for luanded.com, using the worksheet abovet:

My dream clients probably live in the suburbs in a house. They would use a Mon-stor in their kid’s room for fun & convenient storage. Their decorating style is eclectic, colorful & fun, most pieces probably upcycled or from IKEA or a thrift store, so they are probably attracted to my products because they are bright, functional and sustainably made with textile discards and upcycled materials! 

My dream client is likes gentle/authoritative parenting, coffee at home, has a hot mess style parenting, cusses, has tattoos.  If they live in a house in the suburbs they probably like to shop at online, Target, Amazon & thrift stores. They are probably total Starbucks-aholics in the drive through after they drop the kids at school, or drink lots of coffee at home. 

They probably follow MommaCusses, Tori Phantom and Menzenillial because they share gentle parenting in fun and real ways. They likely share it and consume that media because they want to parent in a real, authentic way while living in a real house that isn’t always tidy. They want to simplify their lives as parents.

Let’s explore my dream clients – 20-40’s with 2-3 kids who live in suburban areas, likely tattooed with colorful hair, who want easy ways to clean up their house after a busy day.  They would probably share my Mon-stors because OMG they make cleaning up so easy! Using the information from the worksheet, here is 5 ways I could reach my dream clients where they are:

  • Paid ads on popular parent blogs or sending products to top parenting TikTokers my dream clients follow.
  • Creating lots of content on social media sites that demonstrate how my Mon-stors simplify parenting life & using hashtags that would land them in the right spots.
  • Engaging with people under specific hashtags like #hotmessmom or #busymom.
  • Joining local parenting groups and building commmunity where those parents are.
  • Become an active member of the Facebook groups these people are in & network with fellow parents.

Since I know my dream clients are following moms who share “gentle parenting” tips on social media, I know where I need to focus the majority of my social media efforts in order to get the best impact, too! I also know that they love beautiful, well lit, clutter free images & gentle marketing tactics based on where they shop & who they follow on social media.

By knowing who your dream client is & what their interests and hobbies are, you are able to organically connect with your target audience in what I like to call their “natural environment”. This means that the exposure to your products is not forced-meaning you are not actively sharing a link to purchase with your dream clients but rather speaking to them about their interests.

Marketing to everyone – “This pencil case is perfect for back to school! *link*”

Interacting authentically in your dream clients “natural environment” –  “Is anyone else finished back to school shopping? Here are the school supplies for my kids!” with a photo of a backpack, YOUR pencil case, folders & other accessories where you share your personal experience, and you can write about how fun it was to make the pencil case and how much your kid loves it.

See the difference in how you approach someone in an organic way vs pushy marketing? Organic, authentic connection with dream clients increases engagement on social media posts, on forum threads & invites conversations. Posting a statement about your product and a link is like hitting a wall.

whendreamclientsareonline

Knowing when your dream clients are online gives you a powerful upperhand on the market – you can cater your social media postings & paid ads to exactly the right time for maximum exposure, meaning that you get better results with less effort – so you can spend less time at a computer & more time making awesome things! Yay!

Using the worksheet below, fill in the times for each part of the day to the best of your knowledge about your dream client. Do not pull numbers from your current statistics – you are trying to determine when your dream clients will be online to maximize future exposure of your shop. While your current clients are incredibly valuable, maximizing your marketing to your dream client means increased exposure to people who are the most likely to buy & share your products with others, meaning more sales.

time

Download printable worksheet here

Note: Even if your dream clients don’t have a day job or go to school, try to use this work sheet to pen in what they would be doing through the day & evening – if they are stay at home moms, they are probably getting kids up, fed, dressed, ready for school, cleaning house, doing laundry, running errands and so forth. Use this worksheet however you need to outline the day of your dream client!

First things first, when does your dream client wake up? What is the first thing they do after they wake up? Check Instagram? Read their emails? Brew coffee & take a shower? Get the kids up and ready for school? Getting ready for work? Heading to the gym?

Know when they wake up & their morning routine gives you insight on when to post content that will resonate with their routine – for instance, if your dream client is a mom who wakes up around 7am & rushes around getting the kids ready for school and on the bus, posting a product photo on Instagram at as your first post doesn’t make much sense. However, if you post a picture of your coffee & ask if any other moms out there can relate to the Monday morning blues around 8am, you’re bound to get a much better response to your content. If the first thing they do is roll over and check their emails, maybe a newsletter that goes out first thing in the morning to give them some happy content to wake up to would be a good way to reach them. Make sense?

Another example – say your dream client is a young professional who works in an office in the city and has to be at work by 8am. Odds are they aren’t checking social media right out of bed – they brewing coffee, making breakfast, showering, getting dressed, finishing up last minute projects and getting out the door. If your dream clients are hustling to get work done in the morning, don’t waste that time marketing to empty air.

Knowing when they leave for work, school or are getting the kiddos off to school is super important – if your dream clients have a day job or go to school, and they’ll be in transit & getting started on their day between 8-10am, that means you can better utilize that time to set up a creative morning routine for yourself than plastered to your computer trying to reach people who aren’t there.

*Bonus tip: If your dream client spends a lot of time jogging, at the gym or in transit in the mornings, you could consider setting up playlists on Spotify & sharing them with your audience, or maybe consider a podcast talking about topics that you & your dream clients have in common. (Abby Glassenberg has a wonderful podcast that speaks directly to her dream clients & allows her to connect with them even when they are on the go.)

Lunch time, baby! That sweet spot when most people finally sit down, whip out their phone & start to catch up on all the goodness they missed this morning. It’s your chance to get noticed, so make it good. Lunch time is prime time, and you want to curate content for this period that is valuable – most people have limited time to sit down for lunch, so strategize where they will be spending that time online & make your content as relevant and interesting as you. Keep in mind if your dream clients are professionals on a brief lunch hour, they won’t have time to shop a sale, so plan sales promotions based on when your dream clients have the most free time!

Lunch time doesn’t just mean 12pm – really think about when your dream clients are online, what their day looks like. If they get up at 6am, odds are they eat lunch earlier than noon. If they are a stay at home mom, “lunch” would most likely be naptime, that sweet – & brief – moment of respite when moms can curl up with a snack & check social media. Again, you are operating on limited time at the middle of the day, so make your content king. Make it something that is quick & easy to take in & respond to, even if it’s a like or one word response to a question like  “I can’t decide what fabric to pair with this print for the purse I’m making – what do you think? Option A B or C?”

Knowing when they get off work/school or start picking kids up from school is as important as knowing when they’re busy in the mornings – it’s dead time. Your dream clients are not online right now, so you shouldn’t be either – go make stuff! Your dream clients are busy hustling and shuffling around!

After the afternoon chaos, what are your dream clients up to? Try to think of 3-4 things that probably happens in their life in the afternoons: Gym, grocery store, coffee with friends, homework, soccer, ballet, karate, choir & gymnastics for the kids? Odds are, their afternoon is pretty full right up until dinner time. However, knowing what your dream clients are getting into is vital – you can use this information to curate content that your dream clients will respond well to – do they have a little ballerina? I bet they would love to see pictures of your darling little ballerina, too, if you have one

And then there’s dinner, then there is that sweet, sweet spot where you have a chance to catch them online – that is, if they aren’t lining up kids for showers, doing laundry from the day, packing lunches for the next day, and so on. If your dream client is a mom, odds are they stay busy right up until those kiddos are in bed – and your best chance to reach them is then. Probably between 7-9 pm, when they are unwinding with a glass of wine, their favorite TV show & social media. If your dream client is a college student, are they in evening classes? What time are they most likely to be wrapping up for the day and hanging out online? If your dream client is a young single professional, they are probably online more in the evening, giving you a larger window to get your content to them.

Goodnight, dream clients. When you see your dream clients heading to bed for the night – you should too. Or at least stop posting on social media, because they aren’t there. Market smarter, not harder – use your answers & best judgement from identifying your dream client to know when they are online, and when they aren’t – and when they aren’t online, get off the computer. Use your time better to make awesome things & take care of yourself! As makers, we feel the need to be eternally connected, to see our stats update in real time & overshare on social media, shouting to everyone & hoping someone hears us. No more. Use the information from this series to better utilize your time, to reach people more likely to purchase, and to spend more time doing what you love – making & creating.

Beyond the daily routine, think long term & seasonal schedules for your dream clients. In summer, many people are on vacation, traveling, visiting with family, at the pool, park or zoo – so you can relax your marketing efforts a bit if you find that your dream clients are busy jetsetting to Disneyland and spending their summer by the pool during the day with the kids. During the beginning & finals/end of school term time, college students (and parents) are spending a significant amount less time online, so use this time wisely to build up inventory.

approaching your dream clients

Let’s dive into this last leg of the journey to identifying your target audience with gusto! We know who our dream clients are, what they like,  what website they frequent and when they are online. Let’s strike up a conversation with them!

Before you approach your dream clients, your profile should reflect their interests that we defined throughout this series, because approaching your dream clients is like saying hello & inviting them in for coffee. You have about 10 seconds to get that “like” or “follow” so make sure your profile speaks directly to your dream clients.

If you are approaching people who like fashion, you should have fashion content on your profile. If you can pair your products naturally in these photos without telling people only about your product, that is the best way to approach them & let them know you aren’t in this just for the sales – for instance, a picture of a new top paired with skinny jeans & your latest necklace would most likely interest fashionistas more than a picture of your necklace. Show your dream clients you truly care about topics that interest them & help them relate to you. If you approach them, and make yourself approachable, your dream clients are much more likely to follow you on social media & buy from you.

Yup, it’s that simple – approaching your dream clients has nothing to do with marketing your products.

Crazy concept, right? But hear me out!

Let’s say you are on Instagram & want to connect with your dream clients there. You could post a picture with 37.5 million hashtags (half of which won’t even put you contact with your dream clients, but more on that later) – or, you could review your dream clients interests (let’s say they are into natural parenting) and search relevant hashtags (like the #babywearing hashtag). Ding! Hello, dream clients! You are now staring at tens of thousands of photos by your dream clients – natural parents!

Approaching your dream client is easy – as easy as leaving a comment on social media. Some examples of good ways to approach your dream clients (using the natural parenting tags for our first examples):

“Oh my gosh, your baby is so adorable, and I love that wrap. What brand is it?

“The color of that wrap looks fantastic on you! Did you dye it yourself?”

“Love this image of you & your baby, you’re adorable! What is your favorite way to carry your baby? I’m new to babywearing & wraps intimidate me!”

Notice what all of these have in common? It has nothing to do with you or your products. Nope. Instead, you are a person who appreciates their interests & their lifestyle, not a seller trying to shove your products down their throat. You are complimenting them about something that is important to them. You are building the foundation for conversation & an organic connection, and are exponentially more likely to capture their interest.

Of course there are times you can give a little nod to your business. Let’s say your dream client is into fashion. Search that #ootd (outfit of the day) tag & find outfits that relate to the style of your products. Here is some ways you can approach them:

“I LOVE this outfit! Where did you get the top from? I have a necklace in my shop I would love to pair with that shirt for photos!”

“That sweater looks incredible on you. I need to start working on my fall line of jewelry, I have some designs in my head to pair with bulky sweaters that I can’t wait to work on! What sort of colors do you think will be hot this autumn?”

“Ah, I love sweater dresses!  My favorite way to dress mine up is with this layered necklace I made or some fancy earrings. What accessories do you usually pair with yours? I’m always looking for new ideas!”

Again, it’s all about your dream clients – you start out with a compliment revolving around their content and when appropriate, your products can naturally be brought into the conversation without trying to sell them. This will usually interest the original poster & they will pop over to your profile & take a peek – so again, this means that your profile, no matter what platform you are on, should reflect your dream clients interests which I can pretty much guarantee isn’t only your products.

Another way to find your dream clients & approach them is by following larger brands similar to yours (for instance, if you make toys for preschoolers you could follow people like Melissa & Doug & join conversations in the comments of their posts – again, not talking about you, but talking with peers. Example, you could reply to someone & let them know that your kiddo also plays with X toy – do they have any others they would recommend? Or maybe “My kiddo takes his “insert relative item name here” everywhere too! I just designed a new tote bag for him & ended up adding some to my shop too – it makes getting around so much easier with all the toys in tow!”

Now that you are armed with a few wonderful methods to approach your dream clients, let’s talk about two ways you should never approach your dream clients:

Do not ever post on another businesses social media trying to drive sales. Casually mentioning your products is okay – saying “You can buy that in my shop” or “I make these, too” or telling people “if you are interested in one message me” is never, ever okay on other people’s social media accounts. It is tacky & will most likely result in you getting reported for spam. Just don’t do it. If you can’t organically bring up your products into the conversation without trying to sell them or mentioning your shop, just don’t bring them up.

Bad example: “I have a toy in my shop that you would love for your nursery.”

Good example: “I am loving this nursery! I literally just made a toy that matches the colors you used – I am obsessed with these colors together right now!”

Bad example: “I have a necklace that matches your dress in my shop, you could check it out!”

Good example: “I love your fashion style! I just finished making a gorgeous necklace & your post just gave me a great idea for how to style my outfit for photos!”

The bad examples do nothing to build a connection and are not likely to do anything but get ignored, while the good examples are more likely to strike a conversation or pique their interest so they visit your social media account

Never directly ask people to visit your profile or shop. Again, if you can’t organically mention your work, then don’t mention it at all. If someone asks you where they can check out your work, then by all means tell them your URL. But if it doesn’t come up, don’t mention it.

 –  –  –

At the end of this post, I cannot stress enough: when approaching your dream clients: Be authentic. Never fake your interests or post comments that aren’t genuine. And remember – have fun getting to know your dream clients! The more you engage with your target audience the more you learn what sort of content resonates with them.

And with that, that’s the end of my series on getting to know and learning to approach your dream clients!

Thank you to everyone who joined in on our dream client series! I hope you had fun identifying & getting to you know your dream clients, and hope this post was informative and helpful! 

In the comments, please feel free to share your thoughts on this process! I would love to know how it has helped you identify your dream clients & approach them! 

Business

100+ hashtags for handmade businesses, makers and small shops + tag hacks!

Do you ever wish there was just a perfect, ready to use, list of hashtags to pull from for Instagram? Well, now there is! I’ve been researching, experimenting, and perfecting the perfect mix of hashtags for a handmade business for MONTHS. Literally. I started the draft of this post in December of 2016, and have tweaked it constantly, adding & deleting tags constantly as I found which got the best responses, the most engagement, and of course the ones that didn’t end up throttling my posts, reducing visibility or even penalizing my entire account! (Yes! That can happen!!)

Below, you will find hashtags sorted into groups. There’s a various amount of tags in each group, and several are repeated in different groups. Repeated tags are great for use on basically any post about handmade businesses! Then there are some that are highly targeted for specific types of posts,  from WIP images to finished products to selfies & more! I set it up this way so you can copy & paste directly from this list into your IG posts, then add your own curated tags specific to your medium – for instance, I usually throw in tags like #monstertoys, #toystorage or #instagramkids for my Mon-stor posts. If you make jewelry, you will want to put in specific tags – #handmadejewelry #datenight #wedding #bridetobe #prom and so on! For drawing or painting or art makers, you will want to use specific tags like #prismacolor #penandink #drawing #watercolor and on and on. These little tag packets just help you get started!

WIP photos

IMG_8304 copy.JPG

WIP (work in progress shots) are a great way to share your story as a maker. Humans are drawn to the process, and seeing products being made creates a connection between consumers and your product.

#handmade #handcrafted #creativedaily #wip #workinprogress #makersgonnamake #makersmovememnt #mycreativebiz #creativedaily #creativelifehappylife #abmcrafty #handsandheart #handsandhustle #cylcollective #calledtobecreative #artistoninstagram #abmcrafty #madebyhand #whatimade #goalgetter #cantstopwontstop #craftbuzz #handmadelove #craftstagram #makingart #doitfortheprocess #makearteveryday #creativeliving #creativelife #artsandcrafts

Product photos

IMG_0209 copy

Show off your work! These tags are highly curated and many put your product photos in the sights of top handmade publications, feeds & influencers!

#handmade #handcrafted #makersgonnamake #makersmovement #mycreativebiz #handmadebyme #whatimade #creatorslane #handmadeisbetter #craftsposure #creativelifehappylife #helloimhandmade #supporthandmade #makersvillage #thehandmadeparade #makersofinstagram #abmcrafty #craftaholic #communityovercompetition #creativepreneur #creativedaily #handsandheart #handsandhustle #cylcollective #handmadewithlove

Selfies

IMG_0283.jpg

People love to know the person behind the process, so every once in a while, throw up a selfie and tell people something personal! Bonus points if you wiggle a handmade product into the pic, or wear jewelry/clothing from another maker and tag them in the photo.

#me #makersgonnamake #makersmovement #communityovercompetition #creativedaily #creativelifehappylife #abmcrafty #abmhappylife #selfie #behindthescenes #handsandheart #handsandhustle #goalgetter #goaldigger #meetthemaker #mycreativebiz #livecolorfully #mycreativebiz #makersofinstagram #ladyboss #girlboss #shescrafty #womanownedbusiness #womanpreneur #mompreneur #craftybitch #craftygirl #girlbossmoment

Sale posts

monstersmake.PNG

Whether you are posting a discount sale, stating products are up for grabs, your new line dropped or that you just restocked, these tags will get your products out there and get people interacting with your posts!

#handmade #handcrafted #makersgonnamake #makersmovement #creativelifehappylife #abmcrafty #handmadeisbetter #makersofinstagram #shopsmall #supportlocal #golocal #buyhandmade #supporthandmade #shopsmallbusiness #womanownedbusiness  #creativedaily #handmadewithlove #ilovehandmade #handmadeshop #handmadeisbest #buzzfeed #huffpost #craftsposure #makersvillage #creatorslane #favehandmade #thehandmadeparade

Now for the fun ones – TAG HACKS! These hacks help you get more connections, engagement, and opportunities while also increasing engagement, but require a little work on your part to actually find the tags best suited for use for your medium/brand/products/audience.

IMG_8640.jpg

Publications

Do you know a publication, popular Instagram account, blog or magazine you want to see your stuff – and maybe share it? Find out if they have specific tags for reposts, or a tag for their brand, and USE IT. Search your niche, find the best publishers, follow them, use their tags. For instance, I use #punkymoms #momdotme #momazine #buzzfeedparents #huffpostparents & so on to reach publishers who are considered experts to my target audience.

Local tags

It’s important to post tags that are geographical – this opens you up to a LOT of opportunities, from magazine features, award nominations & invites to craft events, to making local maker friends, growing your local audience and securing sales to people who love to shop local.

Use tags relevant to your city, to your state, and your region. Use the nearest large city to you if your area does not have a lot of tags – I live about 20 minutes West of Asheville, but it’s the nearest large city, so that is the tag I use! For example, I use #madeinasheville #madeinnc or #madeinwnc. I also use popular local tags when I do events, like #828isgreat #asheville #AVL #ashevilleNC #wnc #smokymountains #ashevillefolk #ashevillemoms. Pop on Insta, browse the tags and find ones that seem to be trendy. If there isn’t a #madein*yournearestbigcity* tag – make one! Use it on every post – it will catch on!

Audience Capturing

Like I said above, you will want to fill in your posts with tags specifically curated for your audience. This also requires some homework on your part. As a toy maker, I use tags like #igkids #instagramkids #momlife #motherhood #childhoodunplugged #letthembelittle #creativeplay #sensoryplay #learningthroughplay #igbaby #instababy #nurseryinspo #kidsroom #playroom & so on. So you need to identify you target audience & then search through hashtags relevant to them. As you can see from my tags, if jewelry was your medium, you wouldn’t just post #jewelry – you would use tags like #datenight #girlsnightout #wedding #gettinghitched #bride #momofthebride #anniversary #ootd #wwiw – stuff people who will be wearing jewelry to, tags for fashion posts, events people buy jewelry for. Once you identify you target audience, you can find them on social media, browse the hashtags they use, see which ones are applicable to your products, and start integrating them and A/B testing them on posts!

Daily Themes

#meetthemakermonday #makermonday #wipwednesday #throwbackthursday (great for sharing your progress as a maker!) #friyay #flashbackfriday #followfriday #smallbusinesssaturday

Platform/Group Tags

Don’t forget platform centric tags! I sell on Storenvy, so I use #storenvy #storenvyseller & such. For Etsy sellers, there is a MILLION hashtags! Same for Shopify or other selling platforms. Do some digging, find which tags are popular and apply them applicable posts about your shop! Do the same for any communities you are in that have exclusive hashtags for interaction, exposure & feature opportunities, too!

Whew! Grab some tags and get practicing! I am always evolving, switching it up & changing what tags I use – you should too! Try a bunch of these out, and let me know what your results are! Remember, Instagram allows up to 30 hashtags. I recommend putting them in the second comment so as to not look spammy, plus they get buried as people come in commenting, so they are pretty much hidden from sight after 3 comments. Have fun!


Business, home schooling, Parenting

Made for kids, by a kid – Handmade Monster Scarves by Gauge!

One of my favorite things about homeschooling has been how Gauge has been able to pursue his passions & come up with new ways to learn on his own – like becoming an entrepreneur.

It all started last year, when he was still in school, and he told me about an idea he had for a monster product he wanted to make – kid size monster scarves with mouths for pockets to keep your hands warm while you wait on the bus, or between throwing snowballs. But with being in school, and then homework, we never had time to really suss it out. Over the summer, when we started homeschooling (since I was pregnant, we started in July to get a headstart for the inevitable break when she arrived and those days when we just wouldn’t feel like doing school work with a new baby in the house) he mentioned again his monster idea. A few weeks later, he sketched up a design and showed it to me, and we brainstormed how to convert it into an actual product.

Then the fun stuff started! His first prototype, he sewed the mouths in backwards. His second, he wasn’t happy with how the teeth were sewn into the mouths, and his third, he didn’t like his eye stitching. All part of the learning process. He got upset when he discovered how hard creating a new product from scratch was – but learned how to channel his frustration into action to resolve the issue at hand.

IMG_2646 copy.JPG

By his next round of monster scarves, he had worked out pretty much all the kinks and was whizzing through a scarf or two a day!

img_3664-copy

This was a great opportunity for many lessons, besides sewing. He learned about pricing for profit, structuring a sustainable business model around his products since they are seasonal, future planning, budgeting, measuring, graphing sales, targeting a demographic of potential customers, creating a marketing campaign, writing product copy, utilizing keywords to maximize SEO (search engine optimization), projecting ROI (return on investment), taxes and so much more. Skills he would most likely never have learned in public school, but that will aid him in a variety of professions. (plus taxes, why don’t they teach taxes in public schools?!)

img_3107-copy

The end result? One proud, accomplished, educated, driven, hardworking, enthusiastic, passionate little person who isn’t afraid to follow his dreams, set goals, and is dedicated to working hard every day to make things happen and learn through life.

img_3117-copy

Now, thanks to all his hard work, he is launching his first ever product line into the world at age 11 – kid size monster scarves! I listed them in my shop, and you can check out his work here. Thank you so much to everyone who cheered him on through social media as we posted photos of his progress – you have NO idea how happy you made him, how much you encouraged him, and how proud he is thanks to all of your support!

cute handmade scarf for kids with mouths for pockets handcrafted in asheville nc.JPG

Storenvy

Engage – Storenvy’s New Email Marketing Tool to Capture Potential Clients, Address Cart Abandonment & Offer Repeat Buyer Incentives!

You guys! I have some super exciting news to share with you today!!

I’ve had my monster shop on Storenvy.com for almost 7 years. I am a huge advocate for their website because for entrepreneurs both seasoned & just starting out, it is the ideal platform for so many reasons – it’s free to list, free to sell through your custom store, 100% customization, they offer domain hosting & the ability to embed a blog, photo gallery, sizing chart, videos, Instagram feeds – I could go on and on! Storenvy gives you so much control over the appearance and functionality of your shop, and offers so many excellent tools for growth – which is what I’m writing about today!

Storenvy just rolled out a powerful new email service that I have been beta testing for them for a while now, and it makes generating sales and capturing new customers easier than ever! (It will be available to all Storenvy sellers the week of January 23rd.)

Introducing the new Storenvy Engage feature!

16143944_10103570317741476_1581684936_n

Engage was born from Storenvy’s desire to set shop owners up for success and drive their sellers more traffic. This ingenious direct email feature was designed to help sellers harness the power of email marketing to turn Marketplace traffic & Watchers into customers. Engage is free and shows both Marketplace & Custom Store customer analytics, including purchase history (total amount spent & total number of orders), whether they were captured in the Marketplace or Custom Store, when the last time they visited your store was and if they have abandoned their cart. With Engage, you can use those analytics to send email promotions to individual people or entire segments of potential and previous clients, as well as send cart reminder emails to nudge customers to follow through with a purchase after abandoning their cart. To access Engage, you simply have to have your Marketplace Store open & have active listings in it.

16145564_10103571195736966_1377144814_o.png

Here is a quick walk through of the new features, and some tips for maximizing Engage for higher conversion rates.

Firstly, like I mentioned above, your store must be active in the Storenvy Marketplace with active Marketplace listings to access Engage.  You do not need to activate Super Discounts to access the data and send cart abandon emails, but you do have to activate Super Discounts via your Extras tab on your Admin Panel to be able to use the Engage Discount Code features. This costs $5/month & unlocks Engage Discount Codes plus loads of other ways to reward customers! Totally worth the small monthly fee (it’s literally the price of a medium (grande?) white chocolate raspberry mocha at Starbuck’s. Yum!) because the discount code emails bring the cha-ching (in other words, they have a really great conversion rate, especially when used in conjunction with cart abandon emails, which I elaborate on below).

Got Super Discounts set up? Great! Now, let’s explore Engage!

Engage can be sorted into various views – All Customers, Repeat Customers (obviously, anyone who has bought from you more than once), Customers (anyone who has bought from you at least once) & Customer Leads (potential customers). You can search for a customer by name, or click Advanced Formulas to the right of the search box to unlock even more awesomeness.

allview.PNG

How to send discount codes using Engage

To send a discount code to a customer, you select the person you want to send a discount to, then click “Send Now”. This is the screen that pops up.

couponcodes

From the top column, you will choose from active discount codes to apply to this promotional email. Once you pick which discount to offer, you just click send! I sent myself a test email first to see how it looked, and here’s what I got on my end:

emailcode.PNG

Looks great, doesn’t it!? It’s formatted for mobile as well, so it looks sleek in a desktop inbox or on mobile. Buyers can click directly from the email to your shop & the code is automatically applied at checkout.

When someone clicks from that email into your store and places an order, a “Success” icon appears by their name in the Engage window, and their orders have an Engage badge in the Orders Window, too – examples below.

success.PNG

ENGAGEEMAIL.PNG

Engage is really easy to use, and now I am going to go through some ways to leverage this service to get more of those “Success” icons to appear for you!

Utilizing Engage to Address Cart Abandonment

Being able to send a gentle nudge to shoppers who abandoned their cart is such an amazing feature – I mean, I’m a mom. Do you know how often I add stuff to my online cart then get whisked away and completely forget about it? A reminder for that awesomesauce I left in my cart would almost definitely convert into a sale – and that’s exactly what this service offers!

Super Discounts isn’t required to use the Abandoned Cart email feature, but your Marketplace store must be active & have have active listings in it. You can’t, however, entice shoppers who abandoned carts to make a purchase with a discount code without activating Super Discounts.*

To view a segment of customers who abandoned carts, use Advanced Formulas, choose whether you want to sort cart abandons by the last day, week, month or between set dates. Apply your filter, and you can view where your cart abandon issues are happening** (custom or marketplace store), whether the shopper has purchased from you before or not, and the date of the abandoned cart.

cartabandon

To capture these customers, click “Send Now” under the cart column. It brings up this simple message & you just click “Send E-Mail” – easy peasy!

abandon.PNG

*Tip: When you search for cart abandons, you will be able to see which customers you sent a cart reminder message to, and whether it was successful or not. Definitely consider taking the second step to send them a coupon code if the cart reminder didn’t entice them to finish their order. I found the code following the cart reminder almost always sealed the deal!  

**I will be publishing a post soon on what causes cart abandonment and how to reduce the number of cart abandons in your online store!

Utilizing Engage to Convert Watchers into Buyers

Wacthers are people who use the Storenvy Watch function to follow your store & receive email updates about your new products because they like what you sell. Basically, an untapped goldmine until now!  Here’s how to set up a segment for Watchers.

watcherconvert

First, you would click Advanced, then click “Watches Shop” and in the Orders Count row below, select “Equal to” and input 0. This will filter results to show only people who watch your shop who have never purchased from you. (If you activate the Automate feature, this makes sending bulk discounts to watchers a snap! Details on Automate are towards the bottom of this post.)

If you are wanting to capture those potential customers, you can send a discount code to people who Watch your Storenvy shop via the marketplace Watch feature – again, these are people who found your products or shop through the powerful Storenvy Marketplace, liked what they saw & clicked the Watch button (which is a great asset in itself, as it immediately signs them up to get emails whenever you list new products, yay!). This new Engage features allows you to contact Watchers directly through the Storenvy platform to offer buyer incentives to get that first sale!

To create a code just for Watchers, go to Promote tab on your Admin panel & click add new promotion. Give it a name that elaborates what it’s for (“Thanks for following my store on Storenvy!” or “Here’s a code to thank you for Watching my shop on Storenvy!”) and put in the rest of the pertinent info – discount type and amount, code, expiration, etc.

promote.PNG

Tip: Offering a code of 20% or more is the best way to capture a new customer – any discounter greater than 20% is most likely to result in a higher conversion rate, whereas codes offering 15% or less have a much slimmer chance of conversions. 

Then just go down the list & send your code out to Watchers – or sign up for Automated discounts and save yourself from carpal tunnel. It’s worth it, trust me.

Utilizing Engage to Reward Repeat Customer

Honestly, being able to offer exclusive rewards to repeat buyers is my very favorite thing about the new Engage feature! To do this, you click “Advanced Formulas” in top right bar, and in the Orders Count select your segment – you can choose Equal to, Greater Than, or Less Than, then you type in the order number amount. Here, I put in Greater Than 5, so every client who has ever ordered from me more than 5 times will appear in this segment.

repeatbuyers

Similar to creating an exclusive code for Watchers, while I was beta testing Engage I made a code just for repeat buyers, offering 20% off. I titled it “A New Year’s Discount Just for You!” and sent it out the first week of January to everyone who had ordered from my shop 5 or more times, and had great success with the campaign!

How to Automate Campaigns

In order to automate discount campaigns through Engage, you have to activate Super Discounts then activate this feature in your Extras. (Keep in mind, these features aren’t available to the public until the week of January 23rd, so your Extras page will look slightly different than this until it’s released sitewide).

16196105_10103570422591356_335094744_o

It costs $15/month to use the Automate features, but trust me, after manually pushing over 200 Engage discount codes while I was testing this out, it’s well worth the $15 a month! (I may or may not have bribed my son to send half of them for me, so if you have a preteen who is perpetually bored, that is also an option). Cart abandonment automation & discount code automation are two separate features, and each run $15. But! You are able to bundle all features (Domain Hosting, Super Discounts, Automated Discounts and  Automated Cart Abandonment Messages) for $30 – a total of 25% off savings. If you have a large customer base & lots of Watchers, this is a great investment! If you have a slightly smaller customer base, it’s not too terribly difficult to push the campaigns manually, albeit time consuming.

16129901_10103567814797396_2075141556_o

When Automate, you create a discount code, then set it in the lower right hand corner of the discounts page, as shown above. Then just click the Automate/Bulk Send button at the top of the Cart or Discount Code column (shown below), and you can bulk send a campaign to everyone in the segment you currently have selected. This is a stellar way to address all recent cart abandons, reward anyone who ordered from you during a certain time frame, remind people who haven’t ordered from you in a while about your shop or to quickly introduce your brand to all of your Watchers at once. You can also use the Automate feature to send a follow up discount once a month as a gentle reminder to people who haven’t used their coupon yet.

buynow

What kind of epic sorcery is this, you ask? The kind that makes getting your sale in front of your entire audience a million times easier.

Pretty rad, huh?

Before we close out, it’s important to note that all transactions that occur through promotions sent via the Engage function are subject to a nominal 10% commission to Storenvy (because these are sales you would not receive without using Storenvy’s functionalities to drive them). It’s a one time fee for orders placed by customers captured using Engage, so if your client typically shops from your custom store or discovered you there, you will NOT pay 10% commission on future sales from them. Make sense?

What do you think about the new Engage feature? Will you be trying it out?

Storenvy

5 Tips for getting more exposure in the Storenvy Marketplace (or possibly getting featured on their social media accounts!)

A lot of people struggle with leveraging the Storenvy Marketplace. While the dream is being able to just throw some listings up, walk away and make sales, unfortunately, that’s not how selling online works. You have to put in a lot of effort, do a lot of research, network and make connections, and become established as a Marketplace seller to start to really see the benefits of being a part of the Storenvy Marketplace – or any online e-commerce marketplace venue!

But! There are a few things you can do to get more exposure as a Storenvy Marketplace seller, and possibly even get featured on their social media channels! They have over 67,000 Facebook fans, 23,000 Twitter followers & almost 10,000 Instagram followers, so anything you can do to increase the possibility of getting your products selected as an Editor’s Pick or featured by Storenvy should be a priority!

Have amazing, well lit, clutter free product photos.

Have you SEEN their Insta feed?

storenvyinsta.png

Storenvy rocks a highly curated, drool worthy Instagram feed featuring unique items with bright, well lit product photos. There’s no clutter, distracting backgrounds, dark shadows obscuring any details of the products. All of the images singularly focus on the product, they all have excellent lighting and composition and they are all very unique products – however if you visit the shops they are from, you’ll notice the branding from one photo carries over to all the images, providing a very consistent, professional look in their stores. In order to possibly one day see your items hit this line up – you have to deliver photos of ALL of your products that are equal to the quality of images found in their Insta feed. If your product photos don’t meet the aesthetic Storenvy is trying to create, they won’t get featured. Besides good images increasing the likelihood of being featured on their social media channels, they also increase your odds of becoming an Editor’s Pick (meaning your product shows up in every single Storenvy users feed, plus it’s been proven again and again the better your photos, the more likely people are to purchase your products.

Have an active marketplace store

Storenvy loves all of their sellers, but won’t feature shops that don’t have active Marketplace stores on their social media pages, plus you can’t become an Editor’s Pick if you aren’t in the Marketplace – so make sure all of your products are listed for sale in the Storenvy Marketplace! But active doesn’t just mean having listings up, either. The more traffic, Watchers, Envies & sales your Marketplace store is generating, the more likely you are to be featured. So be sure to join the Storenvy Community Group & The Storenvy Collector’s Group I run on Facebook – both will get you active and involved in the Marketplace & increase your odds of getting featured! Also be sure to let people know about your Marketplace side store – pin items from it from time to time, blog about it, let people know they can Envy an item to save it for later if they aren’t ready to purchase. Obviously our goals is to promote our custom Storenvy websites, where sales are free, but the more you work to generate traffic to your Marketplace store the higher your products will appear in search results, which results in more organic traffic as well!

Tag #storenvy & @storenvy in all your posts

Make sure to use the #storenvy hashtag and tag @Storenvy in all your Insta and Facebook posts. This gives them an easy way to find your posts & discover your goods! Plus it groups your posts with other #storenvy posts, so people browsing for Storenvy shops to buy from can find you!

Make sure your Storenvy URL is in your bio or linked on your fan page

Obviously, if Storenvy is going to feature goods from a seller, they want link backs to benefit them. So make sure your Insta bio links to your Storenvy shop, not your Etsy or blog URL, and the same goes for Facebook. As an aside, NOT linking to their Storenvy shop is the main reason a lot of people AREN’T making sales on Storenvy. If you want people to find you on Storenvy, you gotta make sure that you are directing them there. Having the links on your social pages direct to Storenvy will also increase inbound traffic, which boosts your listings in search results. Yay!

Encourage people to shop the Storenvy marketplace

Do you know why Etsy is so successful? Because everyone just says “I got it on Etsy” or “have you tried looking for it on Etsy?” So, it stands to reason, the more people talk about Storenvy, the more sales sellers will generate through the Marketplace.

But also replying to posts on Instagram or Facebook & tagging @Storenvy will show them you’re an avid supporter, which is a lot more likely to put you on their radar than anything else. See a post where someone is talking about selling online? Suggest @Storenvy. Tell them why you love it. When someone asks where to shop for something? Suggest @Storenvy. Put up a post about why you love Storenvy & why people should sell/shop there. Wear your support for the platform on your sleeve and encourage others to as well! It will help the Marketplace thrive, increase organic traffic for all shops, plus let Storenvy know “Hey, guys, I love you. You are doing a great thing here, and I’m happy to be a part of it.” Active community members are more likely to get noticed than silent sellers – so be active and an advocate!

These are just a few of the tips I have for increasing your presence on Storenvy & also increasing your odds of getting featured on their social media channels – I hope you find these tips helpful!

Do you have a specific question about selling on Storenvy? Feel free to leave a comment & I’ll do my best to get a post up with an answer. ♥